Friday 7 December 2012

Joggle Bends, Sheet Metal Brakes and other headaches..

No I haven't been sitting in the warmth of the Living Room with my feet up watching 'Homeland' for the past couple of weeks...well, at least, not all the time! I've been struggling with 'Joggle Bends' - no that's not a euphemism.. Actually the garage is away from the house without any heating. It's about freezing outside so I'm wearing two wool jumpers with thermals under my overalls - mobility is a bit of an issue under multiple layers!

Anyway, when I cut the Trunk Floor out all those months back I had to trash a strip of metal that essentially stiffened the transmission/gearbox mounts. This innocent looking piece of metal mated perfectly to the trunk floor beneath it with Joggle Bends along either edge - a Joggle Bend is basically a step in the metal.

Here's the strip before I replaced the floor back in January this year..


I thought fabricating a new strip would be easy but I realise now that often the jobs that appear the simplest can infact be quite a P.I.T.A!

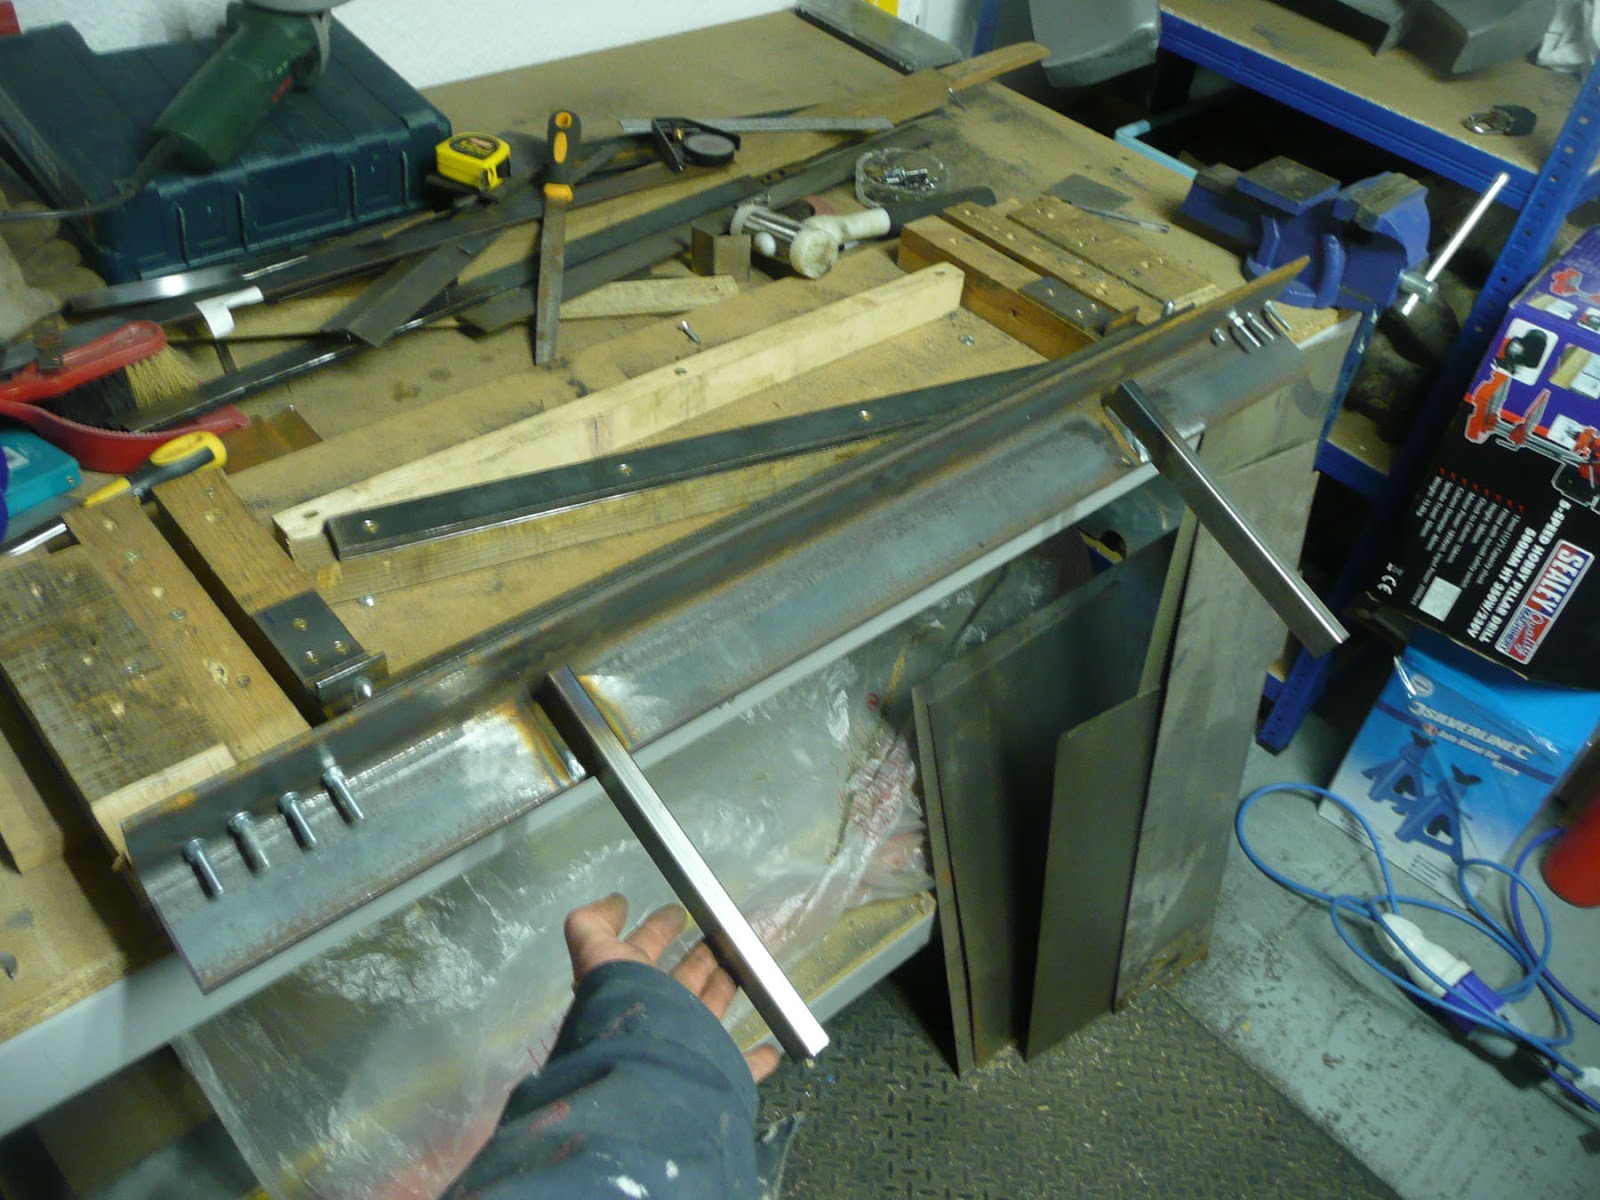
I basically had to make a Sheet Metal Brake or Bender to do the job. 'Off The Shelf' Metal Brakes, at least affordable ones (£50 odd), are only good for single bends and won't do Joggle Bends so the Brake I made out of scraps of MDF, Timber and Angle Iron can do them...hoorah! But the 'machine' needed plenty of fine-tuning to get it to work properly. Here's what it looks like...I can make the Joggle Bends by taking out the base plate you can see in the pic.. I won't go on about it!

But if anyone does actually ever read this and wants to know how I made it, post a comment! Anyone, Bueller, Bueller, Bueller...


I could only make about 30cm lengths of the plate at a time to any accuracy. I needed around 60cm total length so that's obviously two lengths which I'll weld together..duh.

Here are the results of the exercise - pretty much a perfect fit (to my great surprise!)

1. Where it needs to fit..


2. Lining the bits up..


3. Close up of the Joggle Bend..


So just as I'm about to start cutting and sanding the pieces so they fit perfectly together before I weld them, my disc sander blows a fuse...arghh. So that's been sent back to the factory for repair. When it's returned, I'll weld all this lot together and finish the job.

Phew!!

Saturday 17 November 2012

Passenger Jack Post - 'Hacked Off!'

I could see the Long beneath the Jack Post had alot of rot which needs fixing...so off with the Jack Post with the spot weld drill bit, angle grinder and some brute force. The Long is the main structural member that runs along each side of the car at the base of the door opening - connecting the front and rear of the car effectively. It needs to be in great shape for a HP upgrade...

I should mention during this operation, Zoe came in with a cup of tea. I put the drill on my lap as I was sitting on the floor. Finished the cuppa then picked up the drill and inadvertantly pressed it on. It wound up my overalls and started to chew into my thigh!!! Funny looking back on it but it hurt quite alot at the time...daft bu**er! (and I don't mean butter!)

Jack Post succumbing....


Here's the view after the Jack Post has been removed...lots of holes! I'll replace the bad metal and put in a new Jack Post which I already have. This will be a tricky job for me but I think it could have been ALOT worse.


I'll take off the Sill Support which is the triangular bit with the two holes in on the right of the pic above and then weld in new metal to replace the rust.

It'll take a while to get this all done; so for now, I've just covered the area in cheapo primer to prevent surface rust starting..


Passenger Rear Wing - What Lies Beneath!

Marked out the line to cut along in order to expose as much of the chassis beneath. Then....deep breath...gulp...cut along the line with a 1mm disc on a Dremel.


You can see the previous owner's repair job. Many of these plates/patches aren't properly welded - it definitely can't stay this way. I have the proper panel to weld in but it's a big ol' job for as novice like me! Check the pic below..


Looking upwards into that cavity shows more trouble..this bit will be fiddly because there's good and bad metal in close confines and the panel joins are tricky.. What's more I'll need to do some repair to the 'Longs' first - see the next post for more on that.


Friday 2 November 2012

Passenger Rear Wing Paint Strip

...stripped the paint off the rear wing before I chop it off to get at the hell hole. Looks nice under all the crappy paint job.


Rear Brakes and Control Arm Removal

Now the car is settled in its new home and not going anywhere anytime soon, it's time get its wheels off so I can can crack on with the bodywork. I'm going to get on with fixing the notorious 'hell hole' (more on that later) and also stiffen up the chassis; bearing in mind that around twice as much HP than stock is going to be trying to bend the body through the corners!

I've taken off the rear Brakes, Struts and Control Arms. This should be a straight-forward enough job assuming you can get all the nuts and bolts undone. But that's never the case on a car that's been sitting for who knows how long is it! Infact, the brake calipers had seized on one side so I had to dismantle them in situ in order to get them off.

The biggest lesson learned was to loosen the main hub/castle nut before removing the wheels.. handbrake on, chocks in place, a breaker bar AND 4ft cheater bar with a 30mm impact socket later and the nut is loose.

 Then off with everything else: wheels, calipers, discs, disc guards, struts and control arms. A very messy job...


Now for some more paint stripping before attacking the hell hole...

New Home

FINALLY..the 914 is in its new home. Haven't got pics of it but I had to do alot to the prefab garage before I'd want to spend any time in it. I had to repair some walls, paint the walls, trusses and 2-pack paint on the floor. I also cut a pedestrian door into the Ali 'up and over' with a jigsaw - the phrase 'hot knife through butter' springs to mind..tricky but got it done nicely.


Here's the inside...got me posters up too! A proper bloke's hideout in need of a house-warming...


Ian's GT

Things were in limbo following the house move and any spare time I had from work was spent working on the house and garden. The new garage needed alot of work before I moved the car in but I did get a 914 fix when I visited a fellow Porsche addict, Ian Gunney, in Cardiff, to pick up a few bits and pieces.

I bought a mint dash top from him aswell as some early 911 front struts complete with 'M' calipers....I may well use these although a more 'modern' setup with larger calipers might be more suitable with my intended 200hp (ie. 911SC or 3.2 Carrera).

Here are a couple of pics of Ian's Signal Orange GT which has a 2.7 and produces over 200hp.. His garage is like a shrine to Porsche, clearly. He has a lovely 912, a 'parts car' 914 and a Porsche Tractor 'in parts'!


Thursday 31 May 2012

Ready for the move..

I'm going to be moving the car to a new garage in a couple of weeks or so - going on holiday to France until then - hoorah!.

I thought it might be interesting to see the whole car as it is now in my in-laws' garage. Won't be in there for much longer..much to my Father-I-L's great relief...and I think my Mother-I-L is looking forward to having the swallows back, nesting in the rafters. The Swallows originally moved out when I moved in!


I'm constantly thinking about final colour for this car even though, realistically, I probably won't be painting it for at least another two years!!.. I've always thought it would definitely be Viper Green (911 top) or possibly Conda Green like the Max Moritz 914 (upper middle). But then I saw this lovely white one on A J Serrano's site (lower middle). Decisions decisions...still, plenty of time to decide. The bottom pic is of my old genuine six cylinder in Iridian or Iridescent Blue(at least I think it was something like that?).


Door Frame Stiffening

In preparation of getting this car finally onto the Rotisserie(!!) I needed to make some door frame stiffeners. These are just bars of hollow section steel bolted to the top door hinge point and the shoulder fixing point of the seat belt.

The idea is that when the body-shell is lifted up, these stiffeners prevent it from flexing and warping - especially if the main longitudinals (chassis members) are compromised by rust.

I painted the stiffeners in Red Zinc Primer to keep the rust off. (You can also see the flared wheel arches in the pic..can't wait to get these babies on soon!)


Here are detail pics at the fixing points..


Trunk - First coat of Epoxy Primer

Once the Trunk and Rear panel were fully cleaned (or at least as best as humanly possible!), I sprayed on the first coat of Epoxy Primer.

This was my first adventure with the SprayGun  - who knows if my water trap setup made the slightest bit of difference???

I've got to say it took a bit of time to get the hang of the SprayGun and still needs more practice. It's tricky to get the right pressure so the spray goes on smoothly and doesn't 'orange peel'. I think ideally for thicker Epoxy paint a 2.0mm or 2.2mm nozzle would be best - I only have a 1.8mm and the spray was a little 'weak'.

The other trick I learned the hard way is to make sure the hole into the paint reservoir is clear so as the paint empties, it quickly replaces the void with air - otherwise it doesn't vapourise smoothly and efficiently..I am a proper 'anorak' now!

Anyway, here are the results...not the best and plenty of orange peel. But as it's a base layer it's not significant as it will be sanded out later.


And the rear panel too...


Trunk Floor - Final Strip & Clean Up

OK, more pictures of nudity...nude metal that is; sorry to get your hopes up. Here's the trunk/boot area with all the paint stripped. I cleaned off the surface with thinners and then thoroughly with degreaser. I believe the Epoxy paint won't stick well to metal cleaned with thinners alone as it leaves a residue.. I also Kurusted the pitted areas in the metal - I'll find out if that's affected the Epoxy bond when I come to sanding.


Detail shots..I decided to remove all of the factory sealer. I could have left it but it gives me peace of mind as to the state of the metal under it. I will re-seal critical areas before the next coat of Epoxy.


Did the rear panel at the same time..


Saturday 5 May 2012

Trunk Floor - Final Fit and Weld

The Legend of the Trunk Floor continues...I hear you all catching your breath in anticipation!!

Here's the replacement floor to fill that almighty hole. You can see I've drilled the holes in the floor for the plug-welds and cleaned up the metal where the welds will be (around the holes and along the top edge of the pan). This is a view of the bottom of the floor. As part of it will be inaccessible once welded in, it needs to be rust-proofed now. So I've used epoxy primer which doesn't need a top coat to make it waterproof and hence, rustproof (whatever that means!).


 Here's a pic of the top of the pan, which I can paint later. You can see more holes for plug welding to the main car body.


 More holes!!!..and the areas that will fit against the car body are coated with weld-through primer. (Basically this is a spray metal primer with copper particles in it. These allow the electric arc to pass through the primer when welding - but it also helps prevent rust in areas that are inaccessible after welding in place).


 Now, despite being as precise and careful as I could, I made a bit of a mistake when fitting the floor the first time and had to back-track to correct. Basically, at one point, I'd made the gap between the new floor pan and the car too large, so I had to fill-in with sheet - cut and curved to fit. Here's what I mean..

Below you can see the new pan fits much better now..nice and snug. I was looking for no more than a 1.0mm gap. Mostly the pan sits tightly against the car..see later pics!!

For whatever reason I couldn't get the floor to sit flat at these corners so I had to weld-in small spacers. I wonder if the pressing of the pan at these points is difficult to do at manufacture, as it's less crisp and precise than other folds in the pan. Generally the fit is really good. Here's a weld-primed spacer at one end anyway..

The floor is dropped in and carefully and accurately positioned. To get a really precise fit, you need to hammer here and there to get things flat and to line-up but it's simple enough. Here's some pics of the plug and tack welds to hold the floor in place...


Now the final welds to connect the tack welds. I moved from one side to the next along the top seam and did lengths of roughly 40mm at a time so I didn't create too much heat..

Here it is fully welded in place...


Next it needed to be ground smooth and primed. I stupidly forgot to take a pic of the plug welds along the back edge before I painted with primer. At this stage I ground down the welds and cleaned with a wire-brush on the angle grinder. Then I brushed-on Epoxy Primer nice and thickly onto and into the rear seam...


Here's a pic showing the main seam weld once it was ground smooth. It will ultimately be hidden under a re-inforcement plate so I intentionally didn't grind too far, so as not to thin-out the metal too much. It's already quite thin on the 'car side' from previous rust..


For now, I have just Epoxy primed the rear seam both on the top of the pan and beneath. Ultimately, I will apply plenty of seam sealer over this primer to protect from rust more fully. This is how the floor was finished at the factory.. I hope it lasts longer than it did originally! Here are more pics of the finished, primed seam on top of and under the pan.


I temporarily sprayed any other exposed metal with cheapo primer until I get to spraying it properly with the good stuff!..out.