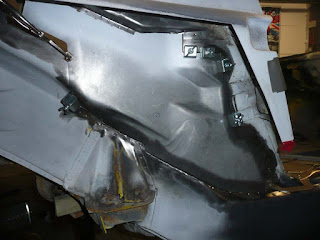
I ground the outside welds down although only partially. I felt it was better to leave the weld largely intact so as not to grind the sheet too thin at any point - and once the wing is welded back in place and the wheel house itself has a black stone-chip coating on it you won't be able to see the welds anyway!
Here it is ground, wire-brushed and de-greased...
Then I painted it with Epoxy Primer. I'll eventually do one or two more coats of the Epoxy before I paint it with black stone-chip paint to finish..
Sunday 23 June 2013
Firewall Hole Patch-Up
Rust from the Hell-Hole had spread into the lower section of the Firewall, so that rust had to be cut-out and the hole filled. Here's the hole from the outside and inside...
Welded.. I will grind it smooth and paint later.
The patch fabricated..
Welded.. I will grind it smooth and paint later.
Inner Wheel House patch-ups...
Because the main hole I needed to fill was larger than the Panel would fill, I had to do a little extra patching. Here are the pics of that....
I patched it in 2 parts. Here's the first patch from the outside.
And the second patch...
I patched it in 2 parts. Here's the first patch from the outside.
And the second patch...
Porsche 914 Inner Wheel House Repair continued...
Now the rusty metal and crappy repair job done by a previous owner have been cut out - and the replacement panel has been cut to fit the hole, it's time to weld it in. The fit is pretty good.
From the inside, you can see the plug welds I made to attach the panel to the inner structure of the Sail Panel.
And here's the whole panel completely welded around...
I used conventional welders clamps together with Integrips to hold the panel in place.. here are pics from the outside and inside before welding.
And here it is tack welded into place.. You've got to be pretty strategic as to which points you tack weld as you move around the panel, so that it doesn't shift or stretch due to the heat of the welds.
From the inside, you can see the plug welds I made to attach the panel to the inner structure of the Sail Panel.
It's also important that when you weld such thin metal that you don't put too much heat into any one point. So I welded roughly inch-long lengths and allowed them to cool before I welded near them again. While they cooled, I would place welds on the other side of the panel. Here you can see the short lengths of weld that I would eventually join together.
And here's the whole panel completely welded around...
Chassis Patch Fabrication
This is the last 'patch' to the main chassis member on the passenger side. It was tricky because there is a curve to the box section which needed to be bent into the patch. Here's the area I needed to patch.
I was using 16ga sheet metal which is roughly 1.5mm thick, maybe a little more. Firstly, I made a straight bend in the sheet with a radius to match the chassis it will sit on - I used a 15mm diameter pipe in the Brake to get the radius.
Then, I cut up the sidewall and bent the part to match the curvature of the chassis. I welded in triangular 'darts' to fill the area that was opened up by the bend. You can just about make out the two small triangles welded in...
Once it fitted, I sprayed the back side with weld-through primer and welded it in place. I still have some final edge-welding and grinding to do to finish it.
Subscribe to:
Posts (Atom)


